Some links in this blog are affiliate links. If you make a purchase through these links, I may receive a small commission. This helps support the site at no extra cost to you.
Your coffee table is more than just a place to set down your mug or remote control; it’s the centerpiece of your living room.
A well-styled coffee table can tie the entire room together, reflecting your personality and taste. But you don’t need to spend a fortune to create a stunning display. With a bit of creativity, you can transform everyday items into beautiful, custom decor.
This guide will walk you through ten unique DIY coffee table decor ideas that are both stylish and budget-friendly.
Get ready to elevate your living space from ordinary to extraordinary, one simple project at a time. We’ll explore everything from rustic-chic trays to modern minimalist arrangements.
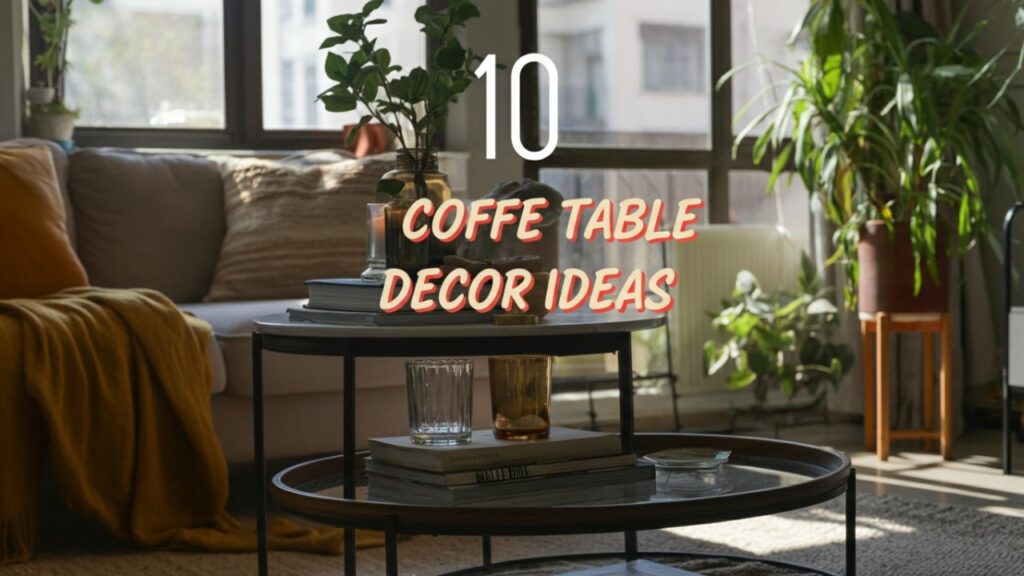
Table of Contents
The Foundation: Why Coffee Table Decor Matters
A coffee table anchors the seating area in your living room. Without any decoration, it can look bare and uninviting. The right decor adds layers of texture, color, and personality, making the space feel complete and lived-in.
DIY decor takes this a step further. It allows you to create pieces that are uniquely yours, ensuring your living room doesn’t look like a carbon copy of a catalog photo. It’s an opportunity to express your creativity and craft a home that truly tells your story.
10 Best DIY Coffee Table Decor
1. The Rustic Chic Serving Tray

A tray is the quintessential coffee table accessory. It corrals your items, creates a defined focal point, and makes it easy to clear the surface when you need more space. Instead of buying one, why not make a custom tray that fits your exact style?
How to Make and Style Your Rustic Chic Serving Tray:
Materials Needed:
- Simple wooden tray (or old baking sheet/picture frame with glass removed)
- Sandpaper
- Wood stain (your choice of shade)
- Stencils and paint (optional)
- Rustic hardware (cast iron handles, optional)
- Screwdriver or drill (if attaching handles)
Steps:
- Lightly sand the tray to smooth out any rough spots.
- Apply your chosen wood stain evenly over the surface. Let it dry according to the instructions.
- (Optional) Personalize the tray using stencils and paint. Add a monogram, favorite quote, or simple geometric pattern to the base.
- (Optional) Attach rustic hardware like cast iron handles to the sides using a screwdriver or drill.
- Let the tray dry completely and clean off any dust before styling.
How to Style:
- Group items in threes or fives for visual interest.
- Combine objects of varying heights: place a short, scented candle, a medium-height vase with fresh flowers, and a stack of your favorite coffee table books on the tray.
- Mix textures and colors for balance and appeal.
Group items in threes or fives for a visually pleasing arrangement. Combine objects of varying heights: a short, scented candle, a medium-sized vase with fresh flowers, and a stack of your favorite coffee table books. This creates balance and visual interest.
2. A Terrarium of Your Own
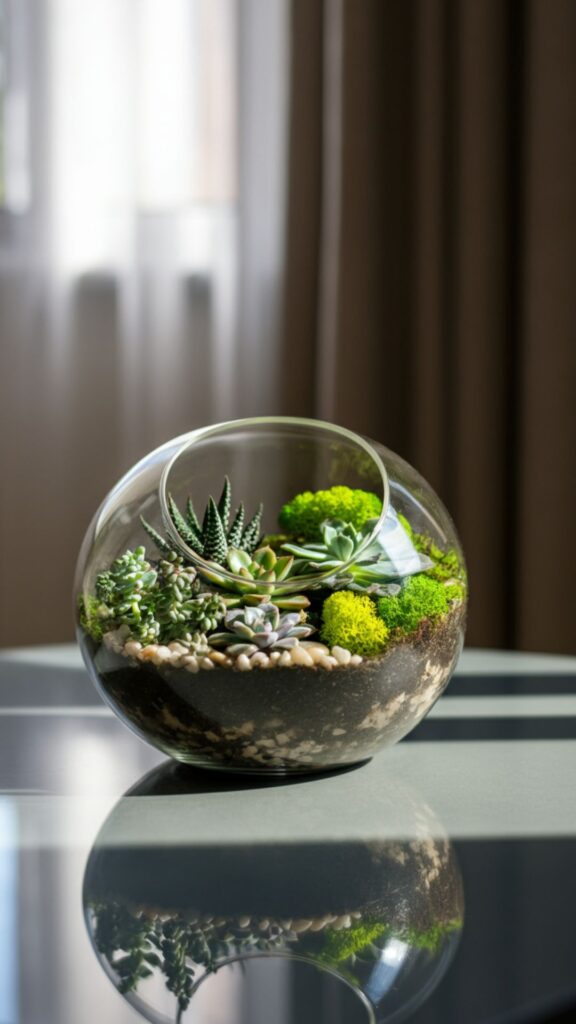
Bring a touch of nature indoors with a DIY terrarium. These miniature glass gardens are not only beautiful but also surprisingly low-maintenance. They add a vibrant, living element to your coffee table, creating a serene and organic focal point.
How to Build It: Step-by-Step
- Choose a Container
Select a clear glass container such as a large jar, fishbowl, or cloche. - Add Pebbles or Gravel
Place a layer of small pebbles or gravel at the bottom to ensure good drainage and prevent plant roots from sitting in water. - Add Activated Charcoal
Sprinkle a thin layer of activated charcoal above the pebbles. This keeps the water fresh and helps prevent bacteria and odor. - Layer Potting Mix
Add a layer of potting soil suitable for your chosen plants (succulents, cacti, or moss). - Arrange Your Plants
Gently plant your succulents, air plants, or moss in the soil. Arrange them creatively, leaving space for each to grow. - Add Decorative Elements
Enhance your miniature landscape with small stones, colored sand, or tiny figurines to give it character. - Care for Your Terrarium
Lightly water your plants, place the terrarium in a bright spot with indirect sunlight, and enjoy your new living decor piece!
Interesting Fact: The first terrarium was developed by botanist Nathaniel Bagshaw Ward in 1842 by accident. He was studying insect behavior and left a cocoon in a sealed glass jar, only to find that a fern spore inside had germinated and grown into a plant. This led to the creation of the “Wardian Case,” which allowed for the transport of plants across the globe.
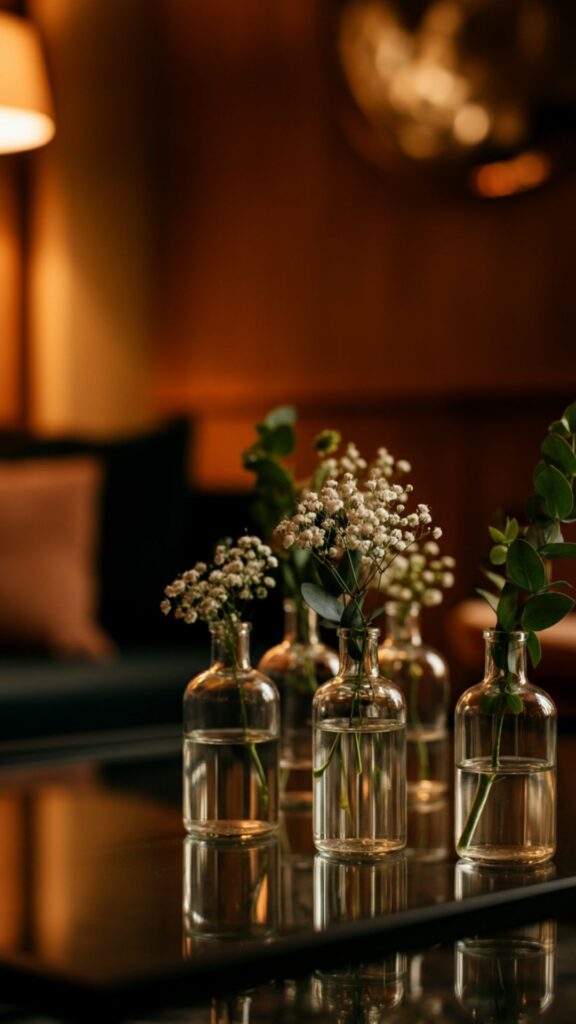
3. Repurposed Bottle Vases
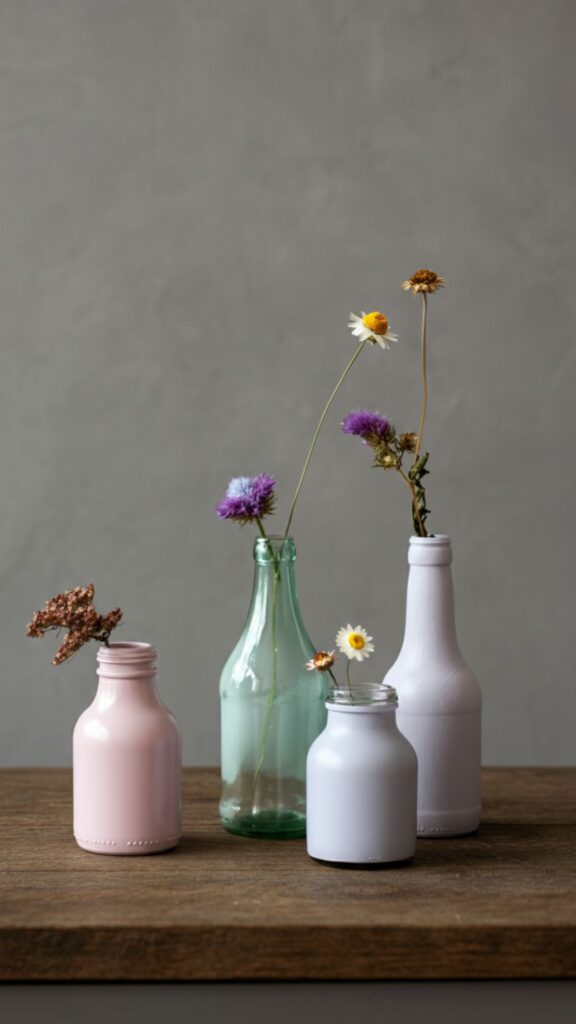
Don’t toss those empty wine, olive oil, or glass soda bottles. With a little cleaning and creativity, they can be transformed into a stunning set of unique vases for your coffee table. Grouping them together creates a more impactful display than a single vase.
How to Do It
- Collect Your Bottles
Gather empty glass bottles, such as wine, olive oil, or soda bottles. The more variety in shape and size, the better! - Remove Labels
Soak the bottles in warm, soapy water. Once the labels loosen, peel them off and scrub away any sticky residue. - Clean and Dry
Wash the bottles thoroughly inside and out. Let them dry completely before decorating. - Add Your Style
- For a minimalist look, leave the bottles clear and pop a single stem, like eucalyptus or a wildflower, into each one.
- For a pop of color, spray paint the outside with a matte finish in shades that complement your decor.
- Another technique is to pour a bit of acrylic paint inside the bottle, swirl it around to coat the interior, and pour out the excess for a smooth, glossy look without brush strokes.
- Display as a Group
Arrange the bottles together in a cluster on your coffee table for the most visual impact. Mixing heights and colors adds extra interest.
4. Stacked & Styled Coffee Table Books
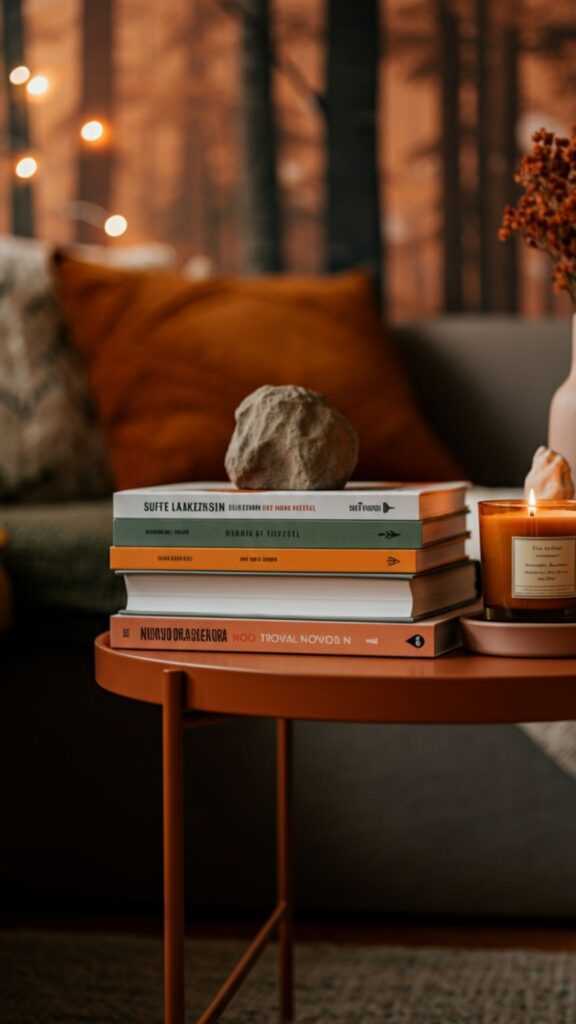
Coffee table books are a classic for a reason. They add color, height, and a glimpse into your interests. Instead of just placing them on the table, be intentional with how you stack and style them.
How to Style Them:
Select three to four books with beautiful covers that complement your room’s color scheme. The key is to vary their sizes. Place the largest book on the bottom and stack the others on top, creating a neat pyramid.
Use this stack as a pedestal for another decorative object. A small, sculptural piece, a unique paperweight, or a beautifully scented candle placed on top of the books adds another layer of dimension and personality. This technique turns a simple stack of books into a curated decorative moment.
5. DIY Scented Candles

Candles add warmth, ambient light, and a beautiful scent to any room. Making your own is a rewarding process that allows you to customize the fragrance and appearance. A cluster of homemade candles can be a beautiful and functional centerpiece.
How to Make Them: Step-by-Step
- Gather your materials:
- Soy wax flakes
- Candle wicks
- Essential oils (for fragrance)
- Containers (teacups, ceramic bowls, or amber glass jars work well)
- Melt the wax:
- Fill a double boiler or use a heat-safe bowl over simmering water.
- Add soy wax flakes and melt them slowly, stirring gently.
- Add fragrance:
- Once the wax is fully melted, allow it to cool slightly.
- Stir in your chosen essential oils. (Try lavender and chamomile for relaxation, or citrus and mint for energy.)
- Prep your containers:
- Secure a wick to the bottom of each container (use a dab of melted wax or a wick sticker).
- Make sure the wick stands tall and centered.
- Pour the wax:
- Carefully pour the scented wax into your containers, leaving some space at the top.
- Ensure the wick stays upright as the wax sets.
- Let the candles set:
- Allow the wax to cool and harden completely—this may take several hours.
- Style your coffee table:
- Group two or three of your homemade candles together for a cozy, inviting look.
Do You Know? The practice of using scented candles for aromatherapy dates back to ancient civilizations. Egyptians used aromatic oils in their candles for rituals and healing, believing that different scents could influence mood and well-being.
6. The Thematic Decor Box
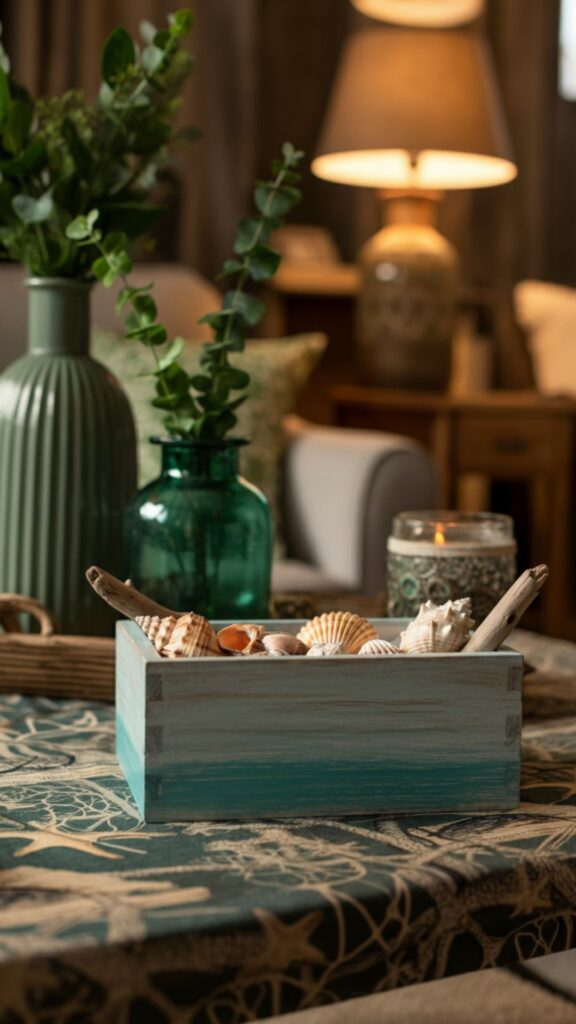
A decorative box is a stylish way to hide away less-than-attractive necessities like remote controls, coasters, or charging cables. You can easily create a custom box that aligns with a specific theme, such as a coastal or travel-inspired look.
How to Create It:
Start with a simple, unfinished wooden box from a craft store. For a coastal theme, paint the box in shades of white, light blue, or sandy beige.
You can glue small seashells or pieces of driftwood to the lid. Lining the inside with a nautical-print fabric adds a thoughtful finishing touch.
For a travel theme, decoupage maps of your favorite cities or countries onto the exterior of the box. Use Mod Podge to seal the paper and give it a durable finish. This not only creates a unique piece of decor but also serves as a beautiful reminder of your adventures.
7. A Rope-Wrapped Bowl or Vase
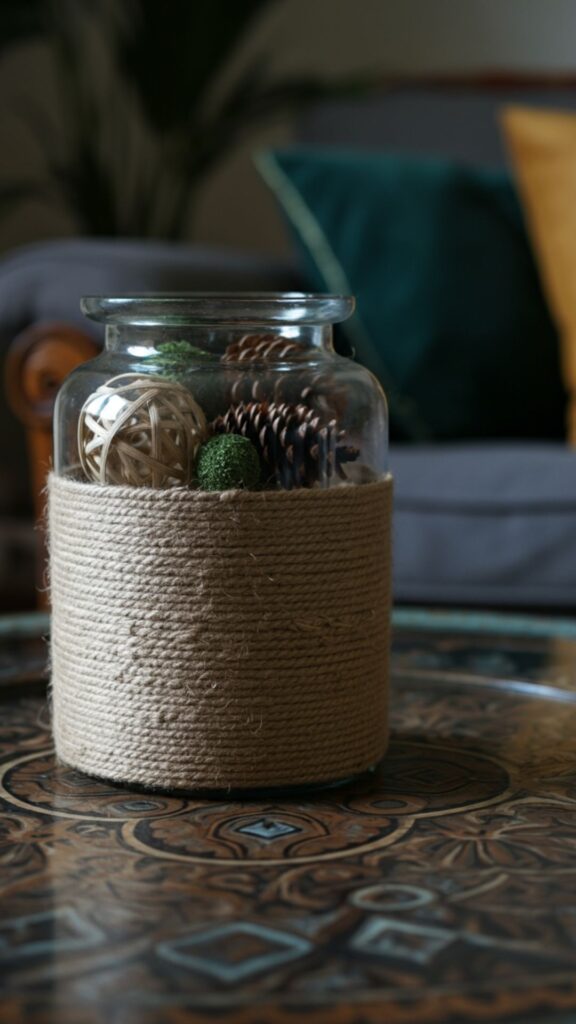
Add texture and a touch of nautical or bohemian flair to your coffee table by wrapping an ordinary bowl or vase with rope. This simple technique can completely transform a plain item into a high-end-looking decorative piece.
How to Make It:
Choose a simple glass vase, a ceramic bowl, or even a tin can. You’ll also need a hot glue gun and rope, such as jute or cotton rope, depending on the look you want. Start at the bottom of the container, applying a line of hot glue and pressing the rope firmly into it.
Continue coiling the rope around the container, adding glue as you go, until you reach the top. Keep the coils tight and straight for a polished look.
You can wrap the entire object or just a section of it to create a color-blocked effect. Fill your new textured bowl with decorative orbs, pinecones, or faux artichokes.
8. Gilded & Glamorous Coasters
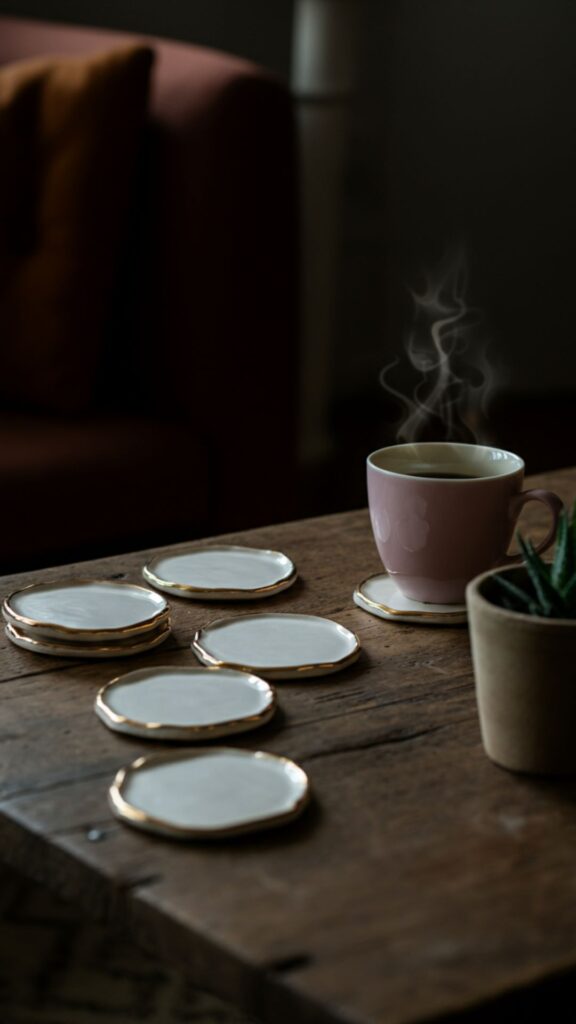
Coasters are a coffee table essential, but they don’t have to be boring. Make your own set of gilded, glamorous coasters using ceramic tiles and gold leaf for a dash of sophisticated sparkle.
How to Make Gilded & Glamorous Coasters:
- Gather Materials:
- Square ceramic or marble tiles
- Gold leaf adhesive
- Gold leaf sheets
- Soft brush
- Clear sealant spray
- Clean the Tiles:
Wipe each tile thoroughly to remove any dust or debris. This helps the adhesive and gold leaf stick properly. - Apply the Adhesive:
Brush a thin layer of gold leaf adhesive around the edges of each tile. Allow the adhesive to become tacky, which usually takes a few minutes. - Add Gold Leaf:
Carefully press gold leaf sheets onto the tacky adhesive around the tile edges. Don’t worry if it’s not perfect—imperfections give it character! - Smooth and Clean Up:
Use a soft brush to smooth the gold leaf and gently brush away any excess flakes. - Seal Your Coasters:
Spray a light coat of clear sealant over the tiles, especially the gold leaf portions, to protect them from moisture and wear. - Style Your Table:
Stack or arrange your finished coasters on your coffee table to add instant chic and shimmer.
Now your coasters are ready to protect your furniture—and impress your guests!
9. The Minimalist Bud Vase Collection
For a modern and minimalist aesthetic, less is more. Instead of one large floral arrangement, create an elegant display with a collection of small bud vases. Each vase can hold a single, delicate stem.
How to Arrange It:
Gather a collection of small glass or ceramic bud vases. They don’t have to match—a mix of different shapes and sizes can add more interest, as long as they share a similar color or material. Think clear glass, white ceramic, or smoked gray.
Arrange three, five, or seven vases in a cluster on your coffee table. Place a single stem in each one. Good options include baby’s breath, craspedia (billy balls), a single rose, or a sprig of greenery. The simplicity of the arrangement is what makes it so striking and elegant.
10. Painted & Patterned Decorative Orbs
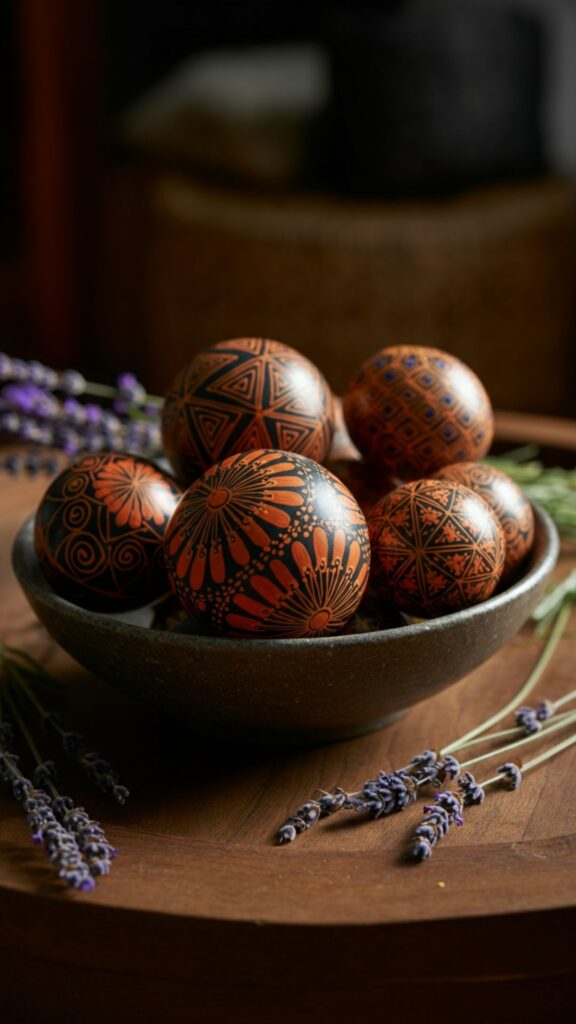
Decorative orbs or spheres are a great way to add shape and texture to a bowl or tray. Instead of buying them, you can create your own custom set using styrofoam balls and a little paint.
How to Create Them:
Purchase a pack of smooth styrofoam balls in various sizes from a craft store. You can create different looks depending on your style. For a modern, concrete-inspired look, mix a small amount of baking soda into gray acrylic paint to create a thick, textured paste. Apply it all over the spheres and let them dry.
For a more intricate design, use painter’s tape to create geometric patterns or stripes on the balls before painting.
Or, use a fine-tipped brush to paint delicate patterns like polka dots, chevrons, or even Moroccan-inspired designs. Once dry, arrange your custom orbs in a shallow bowl or on your rustic tray.
Tying It All Together
Your coffee table is a canvas for your creativity. These ten DIY ideas are just the beginning. The key is to choose projects that resonate with your personal style and the overall feel of your home.
Mix and match different textures, heights, and materials to create a display that is balanced, interesting, and uniquely you.
By investing a little time and effort, you can craft beautiful, personalized decor that turns your coffee table into the true heart of your living room.
So, pick an idea that inspires you, gather your materials, and start creating. You’ll be surprised at how a few simple DIY touches can completely transform your space.
Frequently Asked Questions (FAQs)
What materials are best for DIY coffee table decor?
A: Stick with durable and versatile materials like wood, glass, ceramic, and metal. Natural elements such as stone, rope, and plants also add a cozy, organic touch to your setup.
How do I keep my coffee table decor looking fresh?
A: Dust regularly, switch out flowers or greenery often, and wipe spills promptly. For items like trays or vases, use gentle cleaners that won’t damage finishes.
Any tips for styling a coffee table without making it look cluttered?
A: Focus on grouping items in odd numbers, varying the heights and textures, and leaving some negative space on the table. Remember, less is sometimes more—swap out decor seasonally for a fresh look.
Are there any safety concerns for DIY decor?
A: If you have children or pets, avoid sharp-edged items or fragile glass pieces. Place candles where they can’t be easily knocked over, and never leave an open flame unattended.
What if my table is very small or unusually shaped?
A: Even the smallest coffee table can look stylish with the right approach. Opt for a small plant, a few books, or a single decorative bowl. Adapt the ideas to fit your space and don’t be afraid to experiment.